How to Clone a Cannabis Plant: Step-by-Step Guide
Cloning cannabis plants is an excellent way to preserve your favorite strains and ensure consistent quality in your harvests. Unlike growing from seeds, cloning allows you to create genetic replicas of a plant, ensuring the same potency, yield, and characteristics every time.
What is Cannabis Cloning?
Cloning is the process of taking a cutting from a healthy cannabis plant (the "mother plant") and encouraging it to grow into a new plant with identical genetics. This technique is commonly used by growers who want to maintain specific traits such as potency, flavor, and resilience.
Benefits of Cloning Cannabis
1. Preserves Genetic Quality
Clones inherit the exact genetics of the mother plant, ensuring the same THC/CBD levels, terpene profiles, and growth characteristics.
2. Speeds Up Growth Cycle
Cloning eliminates the germination stage, allowing growers to fast-track plant development and increase harvest frequency.
3. Cost-Effective
Cloning reduces the need to buy new seeds, saving money in the long run.
4. Consistent Yield
By cloning a high-yielding mother plant, you can guarantee similar harvests every cycle.
What You’ll Need to Clone Cannabis
Before you begin, gather the following materials:
- Healthy mother plant (at least two months old)
- Sharp sterilized scissors or razor blade
- Rooting hormone (gel or powder)
- Cloning tray or humidity dome
- Starter cubes or rockwool cubes
- pH-balanced water
- Spray bottle
- Grow lights (CFL or LED recommended)
- Heating mat (optional but recommended for faster rooting)
"This guide will walk you through the entire cloning process, from selecting the right mother plant to successfully rooting and transplanting your clones."
Step-by-Step Guide to Cloning Cannabis
Step 1: Choose a Healthy Mother Plant
Selecting the right mother plant is crucial for successful cloning. Choose a plant that is:
- Strong, healthy, and pest-free
- At least two months old and in the vegetative stage (never clone from a flowering plant)
- Known for its high yield, potency, or other desirable traits
Avoid cloning from weak, stressed, or diseased plants, as their clones will inherit these issues.
Step 2: Take a Cutting
Follow these steps to take a proper cutting:
- Select a strong lower branch with at least two nodes (the point where leaves grow).
- Use a sterilized razor blade or scissors to cut the branch at a 45-degree angle. This increases the surface area for water absorption and promotes faster rooting.
- Cut at least 4-6 inches of the branch to ensure enough stem for rooting.
- Trim excess leaves, leaving only a few on top to prevent excessive moisture loss.
Step 3: Apply Rooting Hormone
Rooting hormone significantly increases the success rate of clones by encouraging root development.
- Dip the freshly cut stem into rooting gel or powder.
- Make sure the bottom node is covered, as roots will emerge from this area.
- Gently tap off excess rooting powder to prevent clogging.
Step 4: Plant the Clone in a Growing Medium
Now it’s time to plant your clone into a rooting medium.
- Make a hole in your starter cube or rockwool with a small tool.
- Gently place the stem into the hole and secure it.
- Ensure the cutting stands upright and does not wobble
Step 5: Create a Humid Environment
Humidity is essential for clones since they lack roots to absorb water.
- Place your clones in a cloning tray with a humidity dome.
- Keep humidity levels between 70-80% using a spray bottle to mist the dome.
- Position a CFL or LED grow light about 12 inches above the clones to provide gentle lighting.
Step 6: Maintain Proper Conditions
For optimal results, monitor your clones daily.
- Temperature: Keep between 72-78°F (22-26°C).
- Humidity: Maintain 70-80%.
- Light Schedule: 18 hours on / 6 hours off.
- Airflow: Provide gentle air circulation to prevent mold.
- Moisture: Mist the leaves daily but avoid overwatering the soil.
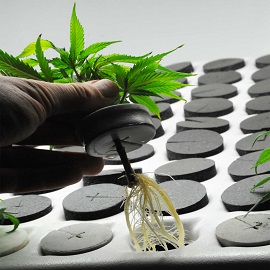
Step 7: Root Development & Transplanting
Clones typically develop roots within 7-14 days. Here’s how to check for root readiness:
- Gently tug the clone. If there is resistance, roots have formed.
- Visible roots emerging from the bottom of the starter cube are a good sign.
Once roots are strong enough, transplant your clone into a larger pot with nutrient-rich soil or hydroponic setup.
Common Cloning Mistakes and How to Avoid Them
Using an Unhealthy Mother Plant
- Solution:Always choose a robust, pest-free, and high-quality mother plant.
Overwatering
- Solution:Keep the growing medium moist but not soaked to prevent root rot.
Poor Humidity Control
- Solution:Use a humidity dome and regularly mist clones.
Insufficient Light
- Solution:Use CFL or LED lights positioned 12 inches away from clones.
Not Using a Rooting Hormone
- Solution:Always apply rooting gel or powder to speed up root development.
FAQs About Cloning Cannabis
Q: Can I clone a flowering cannabis plant?
A: It’s possible, but not recommended. Cloning from a flowering plant ("monster cropping") can cause slow growth and stress. It’s best to take cuttings from a plant in the vegetative stage.
Q: How many times can I clone from the same mother plant?
A: A healthy mother plant can produce clones for 3-6 months before losing vigor. Regularly pruning and providing nutrients will help maintain its health.
Q: Do clones yield the same as seed-grown plants?
A: Yes! Clones have the same genetic potential as their mother plant. However, yield also depends on environmental factors, nutrients, and care.
Q: Can I clone a clone?
A: Yes, but repeated cloning can lead to genetic degradation over time. It’s best to start with a fresh mother plant every few cycles.
Cloning cannabis is a powerful technique that allows growers to maintain genetic consistency, speed up the growth cycle, and save money on seeds. By following this step-by-step guide, you can successfully create and care for your cannabis clones, ensuring a steady supply of high-quality plants. Whether you’re a beginner or a seasoned grower, mastering cloning will take your cultivation skills to the next level. Happy cloning!
Back to Home
Leave a Comment